When a single MariaDB/MySQL server is no longer able to serve the traffic, it’s time to upgrade to a more reliable and easy to upgrade database server. For scaling MariaDB we can use Galera which is already included in mariadb-server package in Debian 11.
Galera doesn’t provide a way to balance the connection from the client to the database server itself, so we’ll use HAProxy for this purpose. HAProxy is built with sophisticated and customizable health checks methods, allowing a number of services to be load-balanced.
Server list
192.168.88.31 mariadb-cluster-01
192.168.88.32 mariadb-cluster-02
192.168.88.33 mariadb-cluster-03
192.168.88.35 mariadb-haproxy
Set the server on the same spec, because it’ll use the weaker one as the reference for all the clusters.
1. Initial Setup
The first thing to do after installing the os, is to update all the packages on the system
sudo apt update && sudo apt upgrade -y
do this on regular basis, but take a careful look when you’re updating the MariaDB because it can cause some downtime.
Setting Server Hostname
Set a proper name for each server, it’ll really helpful when doing some work on the server, because it can recognize by its hostname.
# server haproxy
sudo hostnamectl set-hostname --static mariadb-haproxy
# server mariadb 1
sudo hostnamectl set-hostname --static mariadb-cluster-01
# server mariadb 2
sudo hostnamectl set-hostname --static mariadb-cluster-02
# server mariadb 3
sudo hostnamectl set-hostname --static mariadb-cluster-03
then run this command on each server (MySQL and HAProxy)
echo '192.168.88.31 mariadb-haproxy
192.168.88.32 mariadb-cluster-01
192.168.88.33 mariadb-cluster-02
192.168.88.35 mariadb-cluster-03' | sudo tee -a /etc/hosts
so we can access each server using the hostname instead of the IP address. We won’t use the hostname to access the server itself, but to keep it in sync on all server, just in case we need to add more servers in the future.
2. Install MariaDB Server
On all of mariadb server (3 Server), install mariadb-server packages, which already included galera cluster.
sudo apt install mariadb-server -y
by default Debian will run the services after installation, so we’ll need stop the service and run it again after the configuration completed.
sudo systemctl stop mariadbServer mariadb-cluster-01
For the Galera configuration, we need to create new file /etc/mysql/mariadb.conf.d/50-galera.cnf, copy following code
[mysqld]
binlog_format=ROW
default-storage-engine=innodb
innodb_autoinc_lock_mode=2
bind-address=192.168.88.31

# Galera Provider
wsrep_on=ON
wsrep_provider=/usr/lib/galera/libgalera_smm.so

# Cluster IP
wsrep_cluster_name="mariadb-cluster"
wsrep_cluster_address="gcomm://192.168.88.31,192.168.88.32,192.168.88.33"
wsrep_sst_method=rsync
wsrep_node_address="192.168.88.31"
wsrep_node_name="mariadb-cluster-01"
because we set the binding in Galera, then we need to disable the bind-address on default location
sudo sed -i 's/bind-address/#bind-address/g' /etc/mysql/mariadb.conf.d/50-server.cnf
start the cluster from this server
sudo galera_new_clusterCheck the mariadb status
sudo systemctl status mariadbget the cluster size
sudo mysql -e "SHOW STATUS LIKE 'wsrep_cluster_size'"

it only show single server, because we only run 1 server so far. It’ll increase every time we run more server.
Server mariadb-cluster-02
For the Galera configuration, we need to create new file /etc/mysql/mariadb.conf.d/50-galera.cnf, copy following code
[mysqld]
binlog_format=ROW
default-storage-engine=innodb
innodb_autoinc_lock_mode=2
bind-address=192.168.88.32

# Galera Provider
wsrep_on=ON
wsrep_provider=/usr/lib/galera/libgalera_smm.so

# Cluster IP
wsrep_cluster_name="mariadb-cluster"
wsrep_cluster_address="gcomm://192.168.88.31,192.168.88.32,192.168.88.33"
wsrep_sst_method=rsync
wsrep_node_address="192.168.88.32"
wsrep_node_name="mariadb-cluster-02"
because we set the binding in Galera, then we need to disable the bind-address on default location
sudo sed -i 's/bind-address/#bind-address/g' /etc/mysql/mariadb.conf.d/50-server.cnf
start MariaDB server
sudo systemctl start mariadbget the cluster size
sudo mysql  -e "SHOW STATUS LIKE 'wsrep_cluster_size'"
# output
+--------------------+-------+
| Variable_name      | Value |
+--------------------+-------+
| wsrep_cluster_size | 2     |
+--------------------+-------+
Server mariadb-cluster-03
For the Galera configuration, we need to create new file /etc/mysql/mariadb.conf.d/50-galera.cnf, copy following code
[mysqld]
binlog_format=ROW
default-storage-engine=innodb
innodb_autoinc_lock_mode=2
bind-address=192.168.88.33

# Galera Provider
wsrep_on=ON
wsrep_provider=/usr/lib/galera/libgalera_smm.so

# Cluster IP
wsrep_cluster_name="mariadb-cluster"
wsrep_cluster_address="gcomm://192.168.88.31,192.168.88.32,192.168.88.33"
wsrep_sst_method=rsync
wsrep_node_address="192.168.88.33"
wsrep_node_name="mariadb-cluster-03"
because we set the binding in Galera, then we need to disable the bind-address on default location
sudo sed -i 's/bind-address/#bind-address/g' /etc/mysql/mariadb.conf.d/50-server.cnf
start MariaDB server
sudo systemctl start mariadbget the cluster size
sudo mysql  -e "SHOW STATUS LIKE 'wsrep_cluster_size'"
# output
+--------------------+-------+
| Variable_name      | Value |
+--------------------+-------+
| wsrep_cluster_size | 3     |
+--------------------+-------+
Perfect, all servers running and syncing.
Query Testing
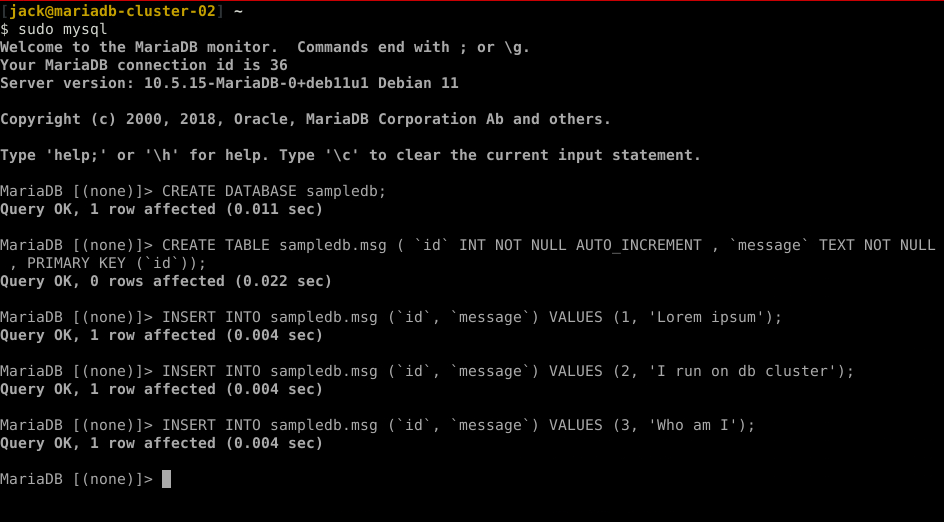
After the initial install is done, now time to test the cluster by creating a dummy database and some data samples. Run this query from any MariaDB server, let’s say we’ll run from mariadb-cluster-03
Login as MariaDB root
sudo mysqlthen create a database and table
CREATE DATABASE sampledb;
CREATE TABLE sampledb.msg ( `id` INT NOT NULL AUTO_INCREMENT , `message` TEXT NOT NULL , PRIMARY KEY (`id`));
INSERT INTO sampledb.msg (`id`, `message`) VALUES (1, 'Lorem ipsum');
INSERT INTO sampledb.msg (`id`, `message`) VALUES (2, 'I run on db cluster');
INSERT INTO sampledb.msg (`id`, `message`) VALUES (3, 'Who am I');
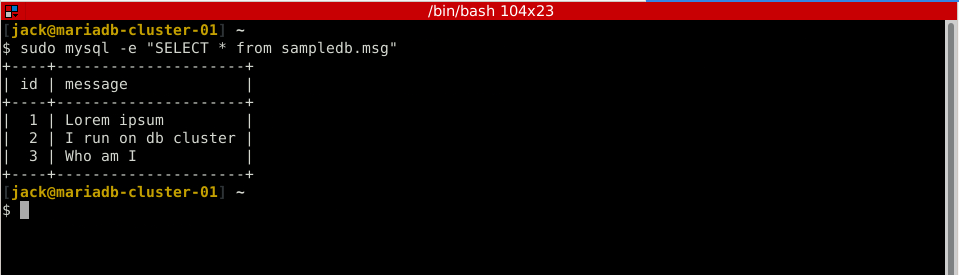
to make sure all the row already sync on cluster from any cluster run
sudo mysql -e "SELECT * from sampledb.msg"
Setup HAProxy Load Balancer
If you’re aware we don’t set any access to our Galera cluster from outside, to make it more secure we’ll only allow access from the HAProxy IP Address. Because we don’t have any load balancer yet, we’ll use these HAProxy as the load balancer.
Install HAProxy from Debian 11 repository
sudo apt install haproxy -y
From any MariaDB server, create user for HAProxy, this user will query by HAProxy periodically to make sure it’s up
CREATE USER 'user_haproxy'@HAPROXY-IP
# example
CREATE USER 'user_haproxy'@192.168.88.35
Create config file /etc/haproxy/haproxy.cfg. In this config we’ll load balance all the three servers equal, that’s why I mention on the beginning we need to make sure all the server specs are equal.
# stats dashboard
listen stats
    bind :8080
    mode http
    stats enable
    stats hide-version
    stats realm Haproxy\ Statistics
    stats uri /
    stats auth admin:password

listen galera_cluster
    bind 192.168.88.35:3306
    balance source
    mode tcp
    option mysql-check user user_haproxy
    option tcplog
    server mariadb-cluster-01 mariadb-cluster-01:3306  check weight 1
    server mariadb-cluster-02 mariadb-cluster-02:3306  check weight 1
    server mariadb-cluster-03 mariadb-cluster-03:3306  check weight 1
Restart HAProxy service
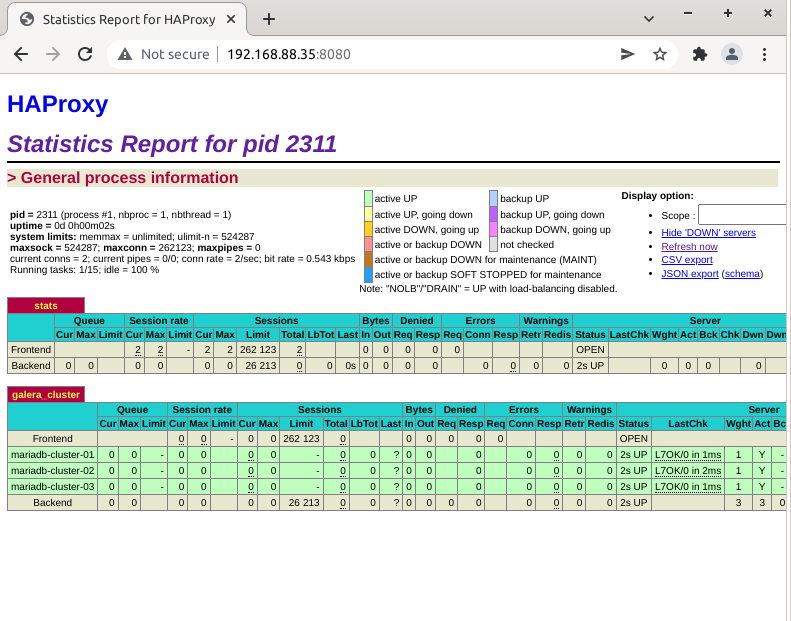
sudo systemctl restart haproxyThen login to HAProxy statistic, port 8080. Using username admin and password password, changes it to more secure password and username.
After everything running, we need to create the user@HAPROXY-IP instead of user@localhost. This setup been deployed to handle million traffic for WordPress